
ComfyUI
ComfyUI is an open-source, node-based AI creation tool designed for users who want precise control over image, video, 3D, and audio generation workflows.
1. Introduction
ComfyUI is not the usual “type a prompt and get an image” kind of tool. It feels more like a visual AI workstation.
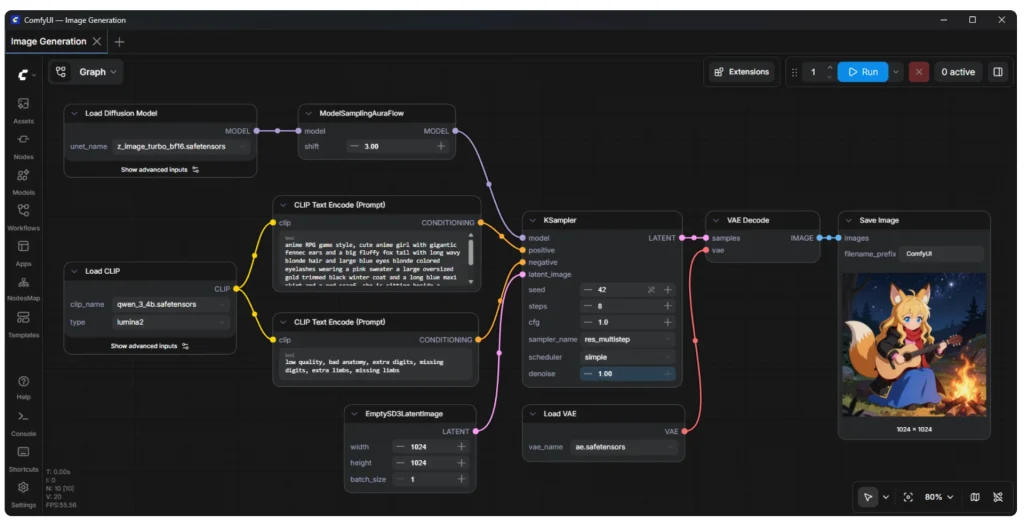
Every part of the generation process—loading a model, entering prompts, choosing a sampler, using ControlNet, upscaling, and saving the final image—is represented by a separate node. You connect these nodes together to build a complete workflow.
At first, the interface can look a little intimidating. Once you understand how the nodes work, however, the main advantage becomes obvious: almost every step is visible and adjustable. You do not have to keep guessing what the software is doing behind the scenes.
ComfyUI is no longer limited to Stable Diffusion image generation. It now supports workflows for images, videos, 3D content, and audio. You can run it locally, install the desktop application, or use the official cloud version.
2. Main Features
Node-Based AI Workflows
You can create workflows by dragging and connecting different nodes. These nodes can control checkpoints, prompts, samplers, image sizes, LoRAs, ControlNet, upscaling, and post-processing.
Once a workflow is finished, it can be saved and reused whenever you need it.
Support for a Wide Range of Models
ComfyUI supports many popular open-source models, including SD 1.x, SDXL, Stable Cascade, Stable Diffusion 3, FLUX, and HunyuanDiT.
It can also connect to selected commercial models through API Partner Nodes.
Image, Video, 3D, and Audio Generation
ComfyUI is much more than an AI image interface these days. With official nodes and community extensions, you can build workflows for:
- Text-to-image generation
- Image-to-image generation
- Inpainting
- AI video generation
- 3D model generation
- Audio processing
Reusable and Shareable Workflows
Images generated with ComfyUI can store workflow information in their metadata. In many cases, you can simply drag a generated image back into the interface to restore its original nodes and settings.
This is especially useful when you want to reproduce a result or share a workflow with someone else.
ComfyUI also includes workflow templates that you can load and customize instead of starting from an empty canvas.
Custom Node Ecosystem
The community has created a huge number of Custom Nodes for image processing, video editing, model training, color correction, automation, and other tasks.
Most extensions can be installed and managed through ComfyUI Manager. That said, third-party nodes can occasionally cause dependency conflicts or compatibility problems, so it is best to stick with trusted and actively maintained extensions.
API and Automation Support
ComfyUI workflows can also be executed through an API. This makes the tool suitable for batch generation, automated production pipelines, and integration with other applications.
3. Product Highlights
A High Level of Control
The biggest advantage of ComfyUI is not simplicity—it is control.
You can adjust a single part of a workflow without rebuilding the entire generation process. This is especially useful for users who need consistent characters, repeatable styles, batch production, or detailed parameter testing.
Easy-to-Reproduce Results
With many AI image tools, you may create a great image one day and struggle to reproduce it later.
ComfyUI keeps the model, parameters, prompts, and processing steps inside the same workflow. This makes it much easier to reproduce a result or identify what went wrong.
Flexible Local Deployment
The local version is free and open source. Your models, workflows, and generated files can stay on your own computer.
As long as your hardware is powerful enough, you do not have to pay every time you generate an image.
Large Extension Ecosystem
New models and techniques are often supported quickly through community nodes and shared workflows.
The downside is that installing too many third-party nodes can make the setup harder to maintain. Updates may occasionally break older nodes or workflows.
Noticeable Learning Curve
ComfyUI is not the friendliest option for complete beginners. Opening a workflow filled with dozens of boxes and connecting lines can be confusing at first.
It is better suited to users who are willing to understand how an AI workflow works, rather than people who only want to enter one prompt and immediately get a finished result.
4. How to Use ComfyUI
Step 1: Choose How You Want to Run It
The easiest option is ComfyUI Desktop, which is mainly available for Windows and Apple Silicon Macs.
Windows users can also use the portable version. Linux users, as well as people using AMD or Intel hardware, may prefer the manual installation method.
The manual version supports a wider range of hardware, including NVIDIA, AMD, Intel, and Apple Silicon devices.
For users without a suitable graphics card, Comfy Cloud runs directly in a web browser and does not require a local installation.
Step 2: Download a Model
After installing ComfyUI, you need to download a compatible checkpoint or another type of AI model.
The model file should then be placed inside the correct ComfyUI model folder. Some official templates can also detect missing models and help you find the required files.
Step 3: Load a Template
Beginners should start with one of the built-in text-to-image templates.
Building a workflow from an empty canvas is possible, but it is usually easier to learn by studying a working example first. Focus on understanding the checkpoint loader, positive and negative prompts, sampler, and image-saving nodes.
Step 4: Enter a Prompt and Generate
Write what you want to create in the positive prompt node. Add unwanted elements to the negative prompt node.
After selecting a model and adjusting the basic settings, click the queue button to start generating the image.
Step 5: Add More Advanced Features
Once the basic workflow works correctly, you can gradually add LoRAs, ControlNet, upscaling, inpainting, face-processing, or video nodes.
Adding one feature at a time makes troubleshooting much easier.
5. Best Use Cases
AI Image Creation
ComfyUI works well for illustrations, posters, concept art, e-commerce images, marketing materials, and social media content.
Consistent Characters and Styles
LoRA, ControlNet, and reference-image nodes can help maintain a character’s appearance, pose, composition, or visual style across multiple images.
Batch Content Production
The queue system and API can automate changes to prompts, image sizes, seeds, or input files. This makes ComfyUI useful for studios and content production teams.
AI Video Creation
You can build workflows for text-to-video, image-to-video, frame interpolation, video upscaling, and post-processing.
Model Testing and Research
ComfyUI makes it easy to compare checkpoints, samplers, prompts, and parameter combinations while seeing exactly how each step affects the final output.
3D and Audio Experiments
Official and third-party nodes can also connect to models for 3D generation, speech processing, music, and other experimental workflows.
6. Pricing
Local Version
The local version of ComfyUI is free and open source.
Your main expenses are the computer hardware, electricity, and storage space needed for large model files.
Comfy Cloud
The official cloud service uses a subscription and credit-based pricing system:
- Standard: $20 per month with 4,200 credits
- Creator: $35 per month with 7,400 credits and support for importing custom LoRAs
- Pro: $100 per month with 21,100 credits and workflows that can run for up to one hour
- Enterprise: Custom pricing
Comfy Cloud uses Blackwell RTX 6000 Pro GPUs with 96GB of VRAM.
Credits are only consumed while a workflow is actively running. Editing or arranging nodes does not use credits.
Free cloud accounts currently receive a small monthly credit allowance, which is enough to test basic workflows before subscribing.
Some Partner Nodes may consume additional credits depending on the model and settings being used.
7. My Experience and Overall Review
ComfyUI is one of those tools that can feel unnecessarily complicated during the first couple of days. Once the workflow logic starts to make sense, it becomes difficult to go back to simpler interfaces.
It may not be the fastest tool for a beginner who only wants to generate a quick image. However, it is one of the strongest options for building advanced and repeatable AI creative workflows.
The node-based interface becomes particularly useful when you start combining multiple LoRAs, ControlNet, reference images, upscalers, and video models. Compared with a standard web interface, it is much easier to see where every part of the process fits.
There are still some practical drawbacks. Model files can take up a lot of storage, large workflows can become messy, and custom nodes sometimes conflict with one another. Software updates can also cause older workflows to stop working correctly.
For casual users, starting with templates or the cloud version makes the most sense. For anyone planning to work seriously with AI images, videos, or automated content production, ComfyUI is well worth learning.